Welcome to our comprehensive guide on ‘Fixing Garage Door Springs: A Step-by-Step Tutorial’ (emergency garage door repair). This tutorial is meticulously designed for homeowners who value a sense of belonging and accomplishment in maintaining their homes.
Our experienced professionals provide a detailed, step-by-step approach to diagnosing and replacing faulty garage door springs. We strive to ensure that each step is explained clearly, providing a robust understanding of the process.
garage door repair garage door service broken spring replacement garage door installation garage door repair garage door service broken spring replacement garage door installation garage door repair garage door service broken spring replacement garage door installation garage door repair garage door service broken spring replacement garage door installation garage door repair garage door service broken spring replacement garage door installation garage door repair garage door service broken spring replacement garage door installation garage door repair garage door service broken spring replacement garage door installation garage door repair garage door service broken spring replacement garage door installation garage door repair garage door service broken spring replacement garage door installation garage door repair garage door service broken spring replacement garage door installation garage door repair garage door service broken spring replacement garage door installation garage door repair garage door service broken spring replacement garage door installation garage door repair garage door service broken spring replacement garage door installation garage door repair garage door service broken spring replacement garage door installation garage door repair garage door service broken spring replacement garage door installation garage door repair garage door service broken spring replacement garage door installation garage door repair garage door service broken spring replacement garage door installation garage door repair garage door service broken spring replacement garage door installation garage door repair garage door service broken spring replacement garage door installation garage door repair garage door service broken spring replacement garage door installation garage door repair garage door service broken spring replacement garage door installation garage door repair garage door service broken spring replacement garage door installation garage door repair garage door service broken spring replacement garage door installation garage door repair garage door service broken spring replacement garage door installation garage door repair garage door service broken spring replacement garage door installation garage door repair garage door service broken spring replacement garage door installation garage door repair garage door service broken spring replacement garage door installation garage door repair garage door service broken spring replacement garage door installation garage door repair garage door service broken spring replacement garage door installation garage door repair garage door service broken spring replacement garage door installation garage door repair garage door service broken spring replacement garage door installation garage door repair garage door service broken spring replacement garage door installation garage door repair garage door service broken spring replacement garage door installation garage door repair garage door service broken spring replacement garage door installation garage door repair garage door service broken spring replacement garage door installation garage door repair garage door service broken spring replacement garage door installation garage door repair garage door service broken spring replacement garage door installation garage door repair garage door service broken spring replacement garage door installation garage door repair garage door service broken spring replacement garage door installation garage door repair garage door service broken spring replacement garage door installation garage door repair garage door service broken spring replacement garage door installation garage door repair garage door service broken spring replacement garage door installation garage door repair garage door service broken spring replacement garage door installation garage door repair garage door service broken spring replacement garage door installation garage door repair garage door service broken spring replacement garage door installation garage door repair garage door service broken spring replacement garage door installation garage door repair garage door service broken spring replacement garage door installation garage door repair garage door service broken spring replacement garage door installation garage door repair garage door service broken spring replacement garage door installation garage door repair garage door service broken spring replacement garage door installation garage door repair garage door service broken spring replacement garage door installation garage door repair garage door service broken spring replacement garage door installation garage door repair garage door service broken spring replacement garage door installation garage door repair garage door service broken spring replacement garage door installation garage door repair garage door service broken spring replacement garage door installation garage door repair garage door service broken spring replacement garage door installation garage door repair garage door service broken spring replacement garage door installation garage door repair garage door service broken spring replacement garage door installation garage door repair garage door service broken spring replacement garage door installation garage door repair garage door service broken spring replacement garage door installation garage door repair garage door service broken spring replacement garage door installation garage door repair garage door service broken spring replacement garage door installation garage door repair garage door service broken spring replacement garage door installation garage door repair garage door service broken spring replacement garage door installation garage door repair garage door service broken spring replacement garage door installation garage door repair garage door service broken spring replacement garage door installation garage door repair garage door service broken spring replacement garage door installation garage door repair garage door service broken spring replacement garage door installation garage door repair garage door service broken spring replacement garage door installation garage door repair garage door service broken spring replacement garage door installation garage door repair garage door service broken spring replacement garage door installation garage door repair garage door service broken spring replacement garage door installation garage door repair garage door service broken spring replacement garage door installation garage door repair garage door service broken spring replacement garage door installation garage door repair garage door service broken spring replacement garage door installation garage door repair garage door service broken spring replacement garage door installation garage door repair garage door service broken spring replacement garage door installation garage door repair garage door service broken spring replacement garage door installation garage door repair garage door service broken spring replacement garage door installation garage door repair garage door service broken spring replacement garage door installation garage door repair garage door service broken spring replacement garage door installation garage door repair garage door service broken spring replacement garage door installation garage door repair garage door service broken spring replacement garage door installation garage door repair garage door service broken spring replacement garage door installation garage door repair garage door service broken spring replacement garage door installation garage door repair garage door service broken spring replacement garage door installation garage door repair garage door service broken spring replacement garage door installation garage door repair garage door service broken spring replacement garage door installation garage door repair garage door service broken spring replacement garage door installation garage door repair garage door service broken spring replacement garage door installation garage door repair garage door service broken spring replacement garage door installation garage door repair garage door service broken spring replacement garage door installation garage door repair garage door service broken spring replacement garage door installation garage door repair garage door service broken spring replacement garage door installation garage door repair garage door service broken spring replacement garage door installation garage door repair garage door service broken spring replacement garage door installation garage door repair garage door service broken spring replacement garage door installation garage door repair garage door service broken spring replacement garage door installation garage door repair garage door service broken spring replacement garage door installation garage door repair garage door service broken spring replacement garage door installation garage door repair garage door service broken spring replacement garage door installation garage door repair garage door service broken spring replacement garage door installation garage door repair garage door service broken spring replacement garage door installation garage door repair garage door service broken spring replacement garage door installation garage door repair garage door service broken spring replacement garage door installation garage door repair garage door service broken spring replacement garage door installation garage door repair garage door service broken spring replacement garage door installation garage door repair garage door service broken spring replacement garage door installation garage door repair garage door service broken spring replacement garage door installation garage door repair garage door service broken spring replacement garage door installation garage door repair garage door service broken spring replacement garage door installation garage door repair garage door service broken spring replacement garage door installation garage door repair garage door service broken spring replacement garage door installation garage door repair garage door service broken spring replacement garage door installation garage door repair garage door service broken spring replacement garage door installation garage door repair garage door service broken spring replacement garage door installation garage door repair garage door service broken spring replacement garage door installation garage door repair garage door service broken spring replacement garage door installation garage door repair garage door service broken spring replacement garage door installation garage door repair garage door service broken spring replacement garage door installation garage door repair garage door service broken spring replacement garage door installation garage door repair garage door service broken spring replacement garage door installation garage door repair garage door service broken spring replacement garage door installation garage door repair garage door service broken spring replacement garage door installation garage door repair garage door service broken spring replacement garage door installation garage door repair garage door service broken spring replacement garage door installation garage door repair garage door service broken spring replacement garage door installation garage door repair garage door service broken spring replacement garage door installation garage door repair garage door service broken spring replacement garage door installation garage door repair garage door service broken spring replacement garage door installation garage door repair garage door service broken spring replacement garage door installation garage door repair garage door service broken spring replacement garage door installation garage door repair garage door service broken spring replacement garage door installation garage door repair garage door service broken spring replacement garage door installation garage door repair garage door service broken spring replacement garage door installation garage door repair garage door service broken spring replacement garage door installation garage door repair garage door service broken spring replacement garage door installation garage door repair garage door service broken spring replacement garage door installation garage door repair garage door service broken spring replacement garage door installation garage door repair garage door service broken spring replacement garage door installation garage door repair garage door service broken spring replacement garage door installation garage door repair garage door service broken spring replacement garage door installation garage door repair garage door service broken spring replacement garage door installation garage door repair garage door service broken spring replacement garage door installation garage door repair garage door service broken spring replacement garage door installation garage door repair garage door service broken spring replacement garage door installation garage door repair garage door service broken spring replacement garage door installation garage door repair garage door service broken spring replacement garage door installation garage door repair garage door service broken spring replacement garage door installation garage door repair garage door service broken spring replacement garage door installation garage door repair garage door service broken spring replacement garage door installation garage door repair garage door service broken spring replacement garage door installation garage door repair garage door service broken spring replacement garage door installation garage door repair garage door service broken spring replacement garage door installation garage door repair garage door service broken spring replacement garage door installation garage door repair garage door service broken spring replacement garage door installation garage door repair garage door service broken spring replacement garage door installation garage door repair garage door service broken spring replacement garage door installation garage door repair garage door service broken spring replacement garage door installation garage door repair garage door service broken spring replacement garage door installation garage door repair garage door service broken spring replacement garage door installation garage door repair garage door service broken spring replacement garage door installation garage door repair garage door service broken spring replacement garage door installation garage door repair garage door service broken spring replacement garage door installation garage door repair garage door service broken spring replacement garage door installation garage door repair garage door service broken spring replacement garage door installation garage door repair garage door service broken spring replacement garage door installation garage door repair garage door service broken spring replacement garage door installation garage door repair garage door service broken spring replacement garage door installation garage door repair garage door service broken spring replacement garage door installation garage door repair garage door service broken spring replacement garage door installation garage door repair garage door service broken spring replacement garage door installation garage door repair garage door service broken spring replacement garage door installation garage door repair garage door service broken spring replacement garage door installation garage door repair garage door service broken spring replacement garage door installation garage door repair garage door service broken spring replacement garage door installation garage door repair garage door service broken spring replacement garage door installation garage door repair garage door service broken spring replacement garage door installation garage door repair garage door service broken spring replacement garage door installation garage door repair garage door service broken spring replacement garage door installation garage door repair garage door service broken spring replacement garage door installation garage door repair garage door service broken spring replacement garage door installation garage door repair garage door service broken spring replacement garage door installation garage door repair garage door service broken spring replacement garage door installation garage door repair garage door service broken spring replacement garage door installation garage door repair garage door service broken spring replacement garage door installation garage door repair garage door service broken spring replacement garage door installation garage door repair garage door service broken spring replacement garage door installation garage door repair garage door service broken spring replacement garage door installation garage door repair garage door service broken spring replacement garage door installation garage door repair garage door service broken spring replacement garage door installation garage door repair garage door service broken spring replacement garage door installation garage door repair garage door service broken spring replacement garage door installation garage door repair garage door service broken spring replacement garage door installation garage door repair garage door service broken spring replacement garage door installation garage door repair garage door service broken spring replacement garage door installation garage door repair garage door service broken spring replacement garage door installation garage door repair garage door service broken spring replacement garage door installation garage door repair garage door service broken spring replacement garage door installation garage door repair garage door service broken spring replacement garage door installation garage door repair garage door service broken spring replacement garage door installation garage door repair garage door service broken spring replacement garage door installation garage door repair garage door service broken spring replacement garage door installation garage door repair garage door service broken spring replacement garage door installation garage door repair garage door service broken spring replacement garage door installation garage door repair garage door service broken spring replacement garage door installation garage door repair garage door service broken spring replacement garage door installation garage door repair garage door service broken spring replacement garage door installation garage door repair garage door service broken spring replacement garage door installation garage door repair garage door service broken spring replacement garage door installation garage door repair garage door service broken spring replacement garage door installation garage door repair garage door service broken spring replacement garage door installation garage door repair garage door service broken spring replacement garage door installation garage door repair garage door service broken spring replacement garage door installation garage door repair garage door service broken spring replacement garage door installation garage door repair garage door service broken spring replacement garage door installation garage door repair garage door service broken spring replacement garage door installation garage door repair garage door service broken spring replacement garage door installation garage door repair garage door service broken spring replacement garage door installation garage door repair garage door service broken spring replacement garage door installation garage door repair garage door service broken spring replacement garage door installation garage door repair garage door service broken spring replacement garage door installation garage door repair garage door service broken spring replacement garage door installation garage door repair garage door service broken spring replacement garage door installation garage door repair garage door service broken spring replacement garage door installation garage door repair garage door service broken spring replacement garage door installation garage door repair garage door service broken spring replacement garage door installation garage door repair garage door service broken spring replacement garage door installation garage door repair garage door service broken spring replacement garage door installation garage door repair garage door service broken spring replacement garage door installation garage door repair garage door service broken spring replacement garage door installation garage door repair garage door service broken spring replacement garage door installation garage door repair garage door service broken spring replacement garage door installation garage door repair garage door service broken spring replacement garage door installation garage door repair garage door service broken spring replacement garage door installation garage door repair garage door service broken spring replacement garage door installation garage door repair garage door service broken spring replacement garage door installation garage door repair garage door service broken spring replacement garage door installation garage door repair garage door service broken spring replacement garage door installation garage door repair garage door service broken spring replacement garage door installation garage door repair garage door service broken spring replacement garage door installation garage door repair garage door service broken spring replacement garage door installation garage door repair garage door service broken spring replacement garage door installation garage door repair garage door service broken spring replacement garage door installation garage door repair garage door service broken spring replacement garage door installation garage door repair garage door service broken spring replacement garage door installation garage door repair garage door service broken spring replacement garage door installation garage door repair garage door service broken spring replacement garage door installation garage door repair garage door service broken spring replacement garage door installation garage door repair garage door service broken spring replacement garage door installation garage door repair garage door service broken spring replacement garage door installation garage door repair garage door service broken spring replacement garage door installation garage door repair garage door service broken spring replacement garage door installation garage door repair garage door service broken spring replacement garage door installation garage door repair garage door service broken spring replacement garage door installation garage door repair garage door service broken spring replacement garage door installation garage door repair garage door service broken spring replacement garage door installation garage door repair garage door service broken spring replacement garage door installation garage door repair garage door service broken spring replacement garage door installation garage door repair garage door service broken spring replacement garage door installation garage door repair garage door service broken spring replacement garage door installation garage door repair garage door service broken spring replacement garage door installation garage door repair garage door service broken spring replacement garage door installation garage door repair garage door service broken spring replacement garage door installation garage door repair garage door service broken spring replacement garage door installation garage door repair garage door service broken spring replacement garage door installation garage door repair garage door service broken spring replacement garage door installation garage door repair garage door service broken spring replacement garage door installation garage door repair garage door service broken spring replacement garage door installation garage door repair garage door service broken spring replacement garage door installation garage door repair garage door service broken spring replacement garage door installation garage door repair garage door service broken spring replacement garage door installation garage door repair garage door service broken spring replacement garage door installation garage door repair garage door service broken spring replacement garage door installation garage door repair garage door service broken spring replacement garage door installation garage door repair garage door service broken spring replacement garage door installation garage door repair garage door service broken spring replacement garage door installation garage door repair garage door service broken spring replacement garage door installation garage door repair garage door service broken spring replacement garage door installation garage door repair garage door service broken spring replacement garage door installation garage door repair garage door service broken spring replacement garage door installation garage door repair garage door service broken spring replacement garage door installation garage door repair garage door service broken spring replacement garage door installation garage door repair garage door service broken spring replacement garage door installation garage door repair garage door service broken spring replacement garage door installation garage door repair garage door service broken spring replacement garage door installation garage door repair garage door service broken spring replacement garage door installation garage door repair garage door service broken spring replacement garage door installation garage door repair garage door service broken spring replacement garage door installation garage door repair garage door service broken spring replacement garage door installation garage door repair garage door service broken spring replacement garage door installation garage door repair garage door service broken spring replacement garage door installation garage door repair garage door service broken spring replacement garage door installation garage door repair garage door service broken spring replacement garage door installation garage door repair garage door service broken spring replacement garage door installation garage door repair garage door service broken spring replacement garage door installation garage door repair garage door service broken spring replacement garage door installation garage door repair garage door service broken spring replacement garage door installation garage door repair garage door service broken spring replacement garage door installation garage door repair garage door service broken spring replacement garage door installation garage door repair garage door service broken spring replacement garage door installation garage door repair garage door service broken spring replacement garage door installation garage door repair garage door service broken spring replacement garage door installation garage door repair garage door service broken spring replacement garage door installation garage door repair garage door service broken spring replacement garage door installation garage door repair garage door service broken spring replacement garage door installation garage door repair garage door service broken spring replacement garage door installation garage door repair garage door service broken spring replacement garage door installation garage door repair garage door service broken spring replacement garage door installation garage door repair garage door service broken spring replacement garage door installation garage door repair garage door service broken spring replacement garage door installation garage door repair garage door service broken spring replacement garage door installation garage door repair garage door service broken spring replacement garage door installation garage door repair garage door service broken spring replacement garage door installation garage door repair garage door service broken spring replacement garage door installation garage door repair garage door service broken spring replacement garage door installation garage door repair garage door service broken spring replacement garage door installation garage door repair garage door service broken spring replacement garage door installation garage door repair garage door service broken spring replacement garage door installation garage door repair garage door service broken spring replacement garage door installation garage door repair garage door service broken spring replacement garage door installation garage door repair garage door service broken spring replacement garage door installation garage door repair garage door service broken spring replacement garage door installation garage door repair garage door service broken spring replacement garage door installation emergency garage door repair emergency garage door repair emergency garage door repair emergency garage door repair emergency garage door repair emergency garage door repair emergency garage door repair emergency garage door repair emergency garage door repair emergency garage door repair emergency garage door repair emergency garage door repair emergency garage door repair emergency garage door repair emergency garage door repair emergency garage door repair emergency garage door repair emergency garage door repair emergency garage door repair emergency garage door repair emergency garage door repair emergency garage door repair emergency garage door repair emergency garage door repair emergency garage door repair emergency garage door repair emergency garage door repair emergency garage door repair emergency garage door repair emergency garage door repair emergency garage door repair emergency garage door repair emergency garage door repair emergency garage door repair emergency garage door repair emergency garage door repair emergency garage door repair emergency garage door repair emergency garage door repair emergency garage door repair emergency garage door repair
With our profound experience and skills, we aim to empower you to perform this task safely and efficiently.
This guide promises to transform an otherwise daunting task into a manageable home improvement project.
Identifying Broken Garage Door Springs
Before delving into the repair process, it is imperative that homeowners properly identify the signs of a broken garage door spring. These indications often include: – A heavy garage door that’s difficult to lift – A loud bang that resonates from the garage – A door that drops quickly when lowered
A visual inspection could reveal a spring that’s visibly broken or has a gap in between coils. If your garage door’s operation isn’t smooth or if it’s crooked, this could also denote a broken spring.
We, as a community of homeowners, must be vigilant in spotting these signs early. A proactive approach not only saves time and money but also ensures safety. Remember, a broken spring is a common issue that many homeowners face, and you’re not alone in this.
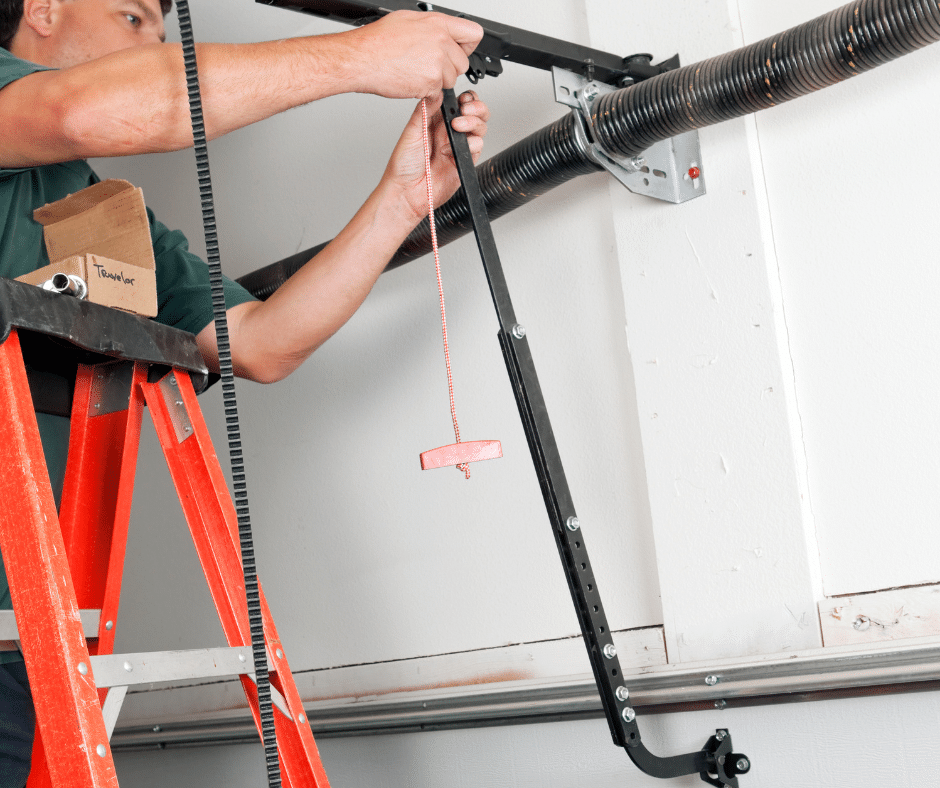
Detailed Spring Replacement Process
Once a broken spring has been identified, it is essential to initiate the meticulous process of spring replacement to restore the optimal functionality of your garage door. This process involves an integral procedural sequence that must be adhered to, for safety and efficiency.
- Unwind Old Springs: This step involves carefully unwinding the tension from the broken spring, ensuring your hands and face are protected from potential harm from sudden release of tension.
- Disconnect Springs from Track: Using appropriate tools, detach the spring from the garage door track.
- Install New Springs: After purchasing the correct replacement spring, install it following the manufacturer’s instructions.
Throughout this process, remember that you are not alone. We are here to assist, guide, and assure you that you are fully capable of this task (emergency garage door repair). Embrace this challenge and take pride in your ability to fix your garage door springs.
READ MORE:
Step-by-Step Instructions for Garage Door Spring Repairs
How to Repair Your Garage Door Springs: A Detailed Guide